Connecting Synology C2 Object Storage
This guide walks you through connecting a Synology C2 Object Storage destination to Pluton.
Prerequisites
Before connecting Synology C2, you need:
- A Synology C2 Object Storage account - Sign up here
- An Access Key ID and Secret Access Key for API access
Getting Your Credentials
Step 1: Create a Synology C2 Account
- Go to the Synology C2 Object Storage page
- Sign in with your Synology Account or create a new one
- Subscribe to the C2 Object Storage plan that fits your needs
Step 2: Generate API Credentials
- Log into the C2 Object Storage Console
- Navigate to your account or credentials settings
- Create a new set of Access Key ID and Secret Access Key
- Important: Copy both credentials immediately — the Secret Access Key may only be shown once
Step 3: Note Your Region
Synology C2 uses region-based endpoints. Identify which region your storage is provisioned in:
- EU Endpoint 1 (
eu-001) - EU Endpoint 2 (
eu-002) - EU Endpoint 3 (
eu-003) - EU Endpoint 4 (
eu-004) - US Endpoint 1 (
us-001) - US Endpoint 2 (
us-002) - US Endpoint 3 (
us-003) - TW Endpoint 1 (
tw-001)
Connecting to Pluton
Step 1: Add Storage
- In Pluton, navigate to Storages
- Click Add Storage button
- Select Synology C2 from the provider list
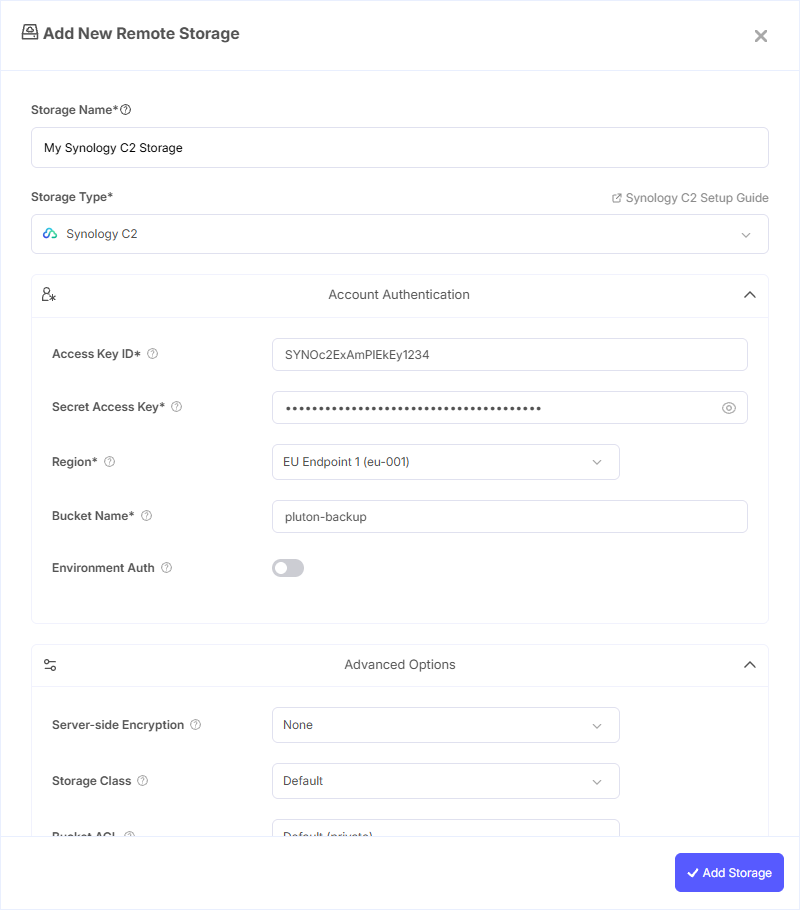
Step 2: Configure Connection
Fill in the required fields:
- Storage Name: A friendly name (e.g., "Synology C2 Backups")
- Access Key ID: Your Synology C2 Access Key ID
- Secret Access Key: Your Synology C2 Secret Access Key (password)
- Region: Select the region matching your C2 storage. The region determines the API endpoint used for connections. Available options include:
- EU Endpoint 1 (
eu-001) - EU Endpoint 2 (
eu-002) - EU Endpoint 3 (
eu-003) - EU Endpoint 4 (
eu-004) - US Endpoint 1 (
us-001) - US Endpoint 2 (
us-002) - US Endpoint 3 (
us-003) - TW Endpoint 1 (
tw-001) - Or insert a custom region value
- EU Endpoint 1 (
- Bucket Name: Your Synology C2 Bucket Name
Step 3: Advanced Options (Optional)
Additional settings available:
- Server-side Encryption: Choose AES256 or KMS encryption for data at rest
- Storage Class: Select the storage class for new objects
- Bucket ACL: Set access control for bucket creation (private, public-read, etc.)
- Upload Cutoff: Threshold for switching to chunked uploads (default: 200 MiB)
- Chunk Size: Size of chunks for multipart uploads (default: 5 MiB)
- Force Path Style: Enabled by default; use path-style access for S3 requests
- Disable Checksum: Skip MD5 checksum storage for faster uploads
Step 4: Complete the Storage Setup
- Click the Add Storage button which automatically verifies credentials and adds the storage.
- Your Synology C2 storage is now ready for backup plans
Common Issues
Authentication Failed: Double-check your Access Key ID and Secret Access Key. Ensure the credentials have not been revoked in the C2 console.
Region Mismatch: Make sure the selected region matches the region where your C2 storage was provisioned. Using the wrong region will result in connection errors.
Bucket Not Found: Verify the bucket exists in your Synology C2 console and that your credentials have permission to access it.
Best Practices
- Generate dedicated API credentials specifically for Pluton backups
- Select the region closest to your Pluton server for optimal transfer speeds
- Enable server-side encryption for sensitive data
- Monitor your Synology C2 storage usage from the C2 console to manage costs
- Use separate buckets for different backup plans for easier organization