Connecting Files.com
This guide walks you through connecting a Files.com storage destination to Pluton.
Prerequisites
Before connecting Files.com, you need:
- A Files.com account - Sign up here
- Your site subdomain and either an API key or username/password credentials
About Files.com
Files.com is a cloud storage service that provides secure file storage, sharing, and automation. It supports multiple authentication methods including API keys and username/password. Files.com offers enterprise-grade features such as audit logging, compliance tools, and advanced access controls.
Getting Your Credentials
Option A: API Key Authentication (Recommended)
- Log into your Files.com account
- Navigate to Settings → API Keys (or follow the API Keys documentation)
- Click Create API Key
- Give the key a descriptive name (e.g., "Pluton Backups")
- Set appropriate permissions and expiration
- Copy the generated API key
- Important: Save the API key immediately — it may only be shown once
Option B: Username/Password Authentication
- Note your Files.com username
- Have your account password ready
- This method works but API key authentication is recommended for automated systems
Note Your Site Subdomain
- Your Files.com site subdomain is the part before
.files.comin your URL (e.g., if your URL ismysite.files.com, the subdomain ismysite) - If you use a custom domain (e.g.,
myfiles.customdomain.com), use the full custom domain instead
Connecting to Pluton
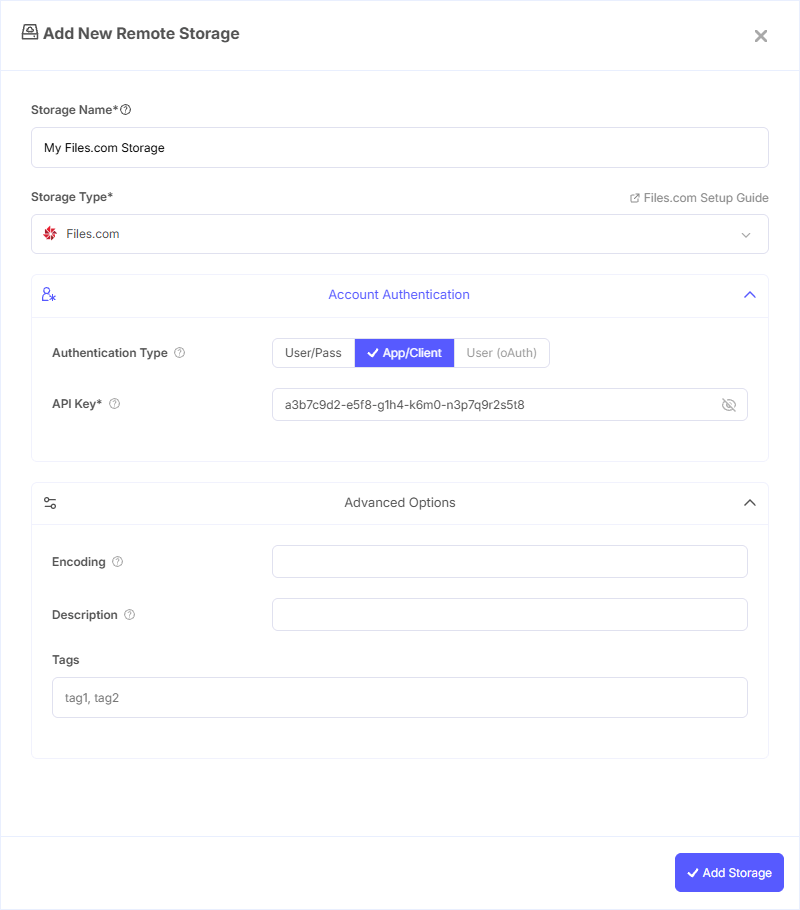
Step 1: Add Storage
- In Pluton, navigate to Storages
- Click Add Storage button
- Select Files.com from the provider list
Step 2: Configure Connection
Fill in the required fields:
- Storage Name: A friendly name (e.g., "Files.com Backups")
- Site Domain: Your site subdomain (e.g.,
mysite) or custom domain (e.g.,myfiles.customdomain.com) - API Key: Your Files.com API key
If using username/password authentication instead:
- Username: Your Files.com username
- Password: Your Files.com password
Step 3: Advanced Options (Optional)
No additional advanced options are required for standard usage.
Step 4: Complete the Storage Setup
- Click the Add Storage button which automatically verifies credentials and adds the storage.
- Your Files.com storage is now ready for backup plans
Authentication Methods
API Key (Recommended):
- Most secure for automated systems like Pluton
- Can be scoped with specific permissions
- Can be revoked independently without changing your password
- Set an expiration date for additional security
Username/Password:
- Simpler setup
- Uses your account credentials directly
- Password changes will require updating the Pluton configuration
You can provide both an API key and username/password, but the API key takes precedence.
Checksums and File Integrity
Files.com supports CRC32 and MD5 checksums for file integrity verification. To use this feature:
- Log into your Files.com account
- Go to Data Governance → File Integrity
- Enable the checksum algorithms you want (selecting at least MD5 is recommended)
- This allows Pluton to verify end-to-end file integrity during backups
Common Issues
Authentication Failure: Verify your API key is correct and hasn't expired. If using username/password, ensure your credentials are current.
Site Not Found: Double-check your site subdomain. It should be just the subdomain (e.g., mysite), not the full URL (mysite.files.com).
Permission Denied: Ensure your API key or user account has read and write permissions for the directories you want to back up to.
Checksum Mismatch: If you see integrity errors, enable MD5 checksums in your Files.com File Integrity settings.
Best Practices
- Use API key authentication for automated backup systems
- Set an expiration date on API keys and rotate them periodically
- Enable MD5 checksums in Files.com for end-to-end file integrity verification
- Create a dedicated folder in Files.com for Pluton backups
- Monitor storage usage and access logs through the Files.com dashboard
- Use the minimum required permissions when creating API keys