Connecting Cloudflare R2
This guide walks you through connecting a Cloudflare R2 storage destination to Pluton.
Prerequisites
Before connecting Cloudflare R2, you need:
- A Cloudflare account - Sign up here
- R2 enabled on your Cloudflare account
- An R2 API token with read/write permissions
Getting Your R2 Credentials
Step 1: Enable R2 Storage
- Log into the Cloudflare dashboard
- Select R2 Object Storage from the left sidebar
- If prompted, complete the R2 setup process
Step 2: Create an R2 API Token
- In the R2 overview page, click Manage button
- Click Create User API Token
- Give your token a descriptive name (e.g., "Pluton Backups")
- Set permissions to Object Read & Write
- Optionally restrict the token to specific buckets
- Click Create User API Token
- Important: Copy the Access Key ID and Secret Access Key immediately — they are shown only once
Step 3: Note Your Account ID
- Your Account ID is displayed in the Cloudflare dashboard URL or on the R2 overview page
- Copy this value — Pluton uses it to generate the R2 endpoint automatically
Connecting to Pluton
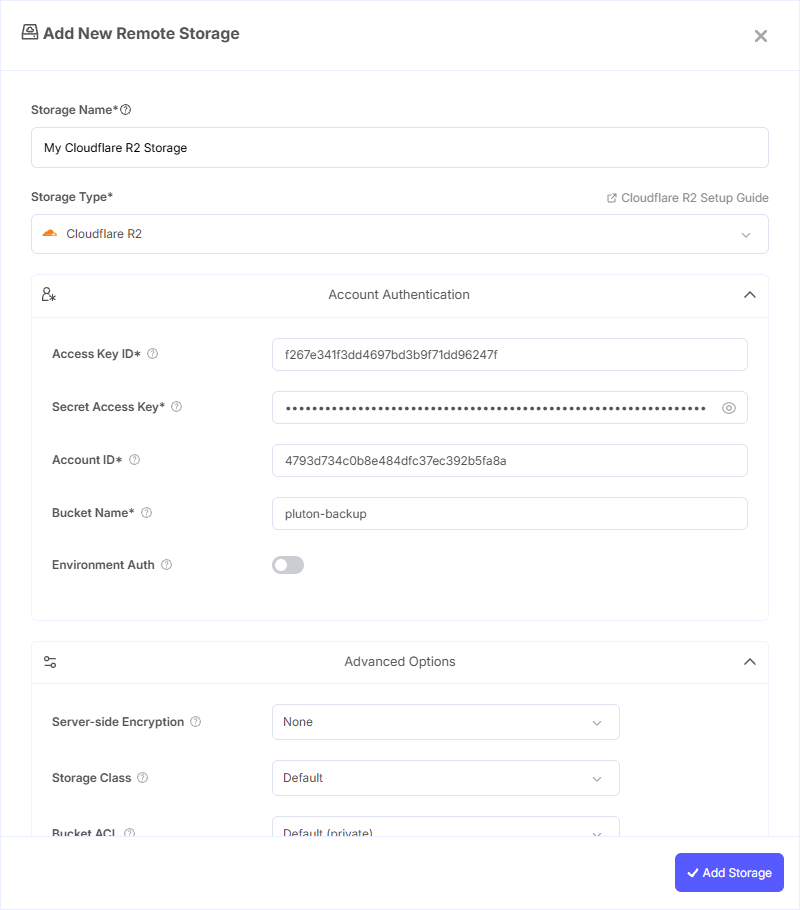
Step 1: Add Storage
- In Pluton, navigate to Storages
- Click Add Storage button
- Select Cloudflare R2 from the provider list
Step 2: Configure Connection
Fill in the required fields:
- Storage Name: A friendly name (e.g., "R2 Production Backups")
- Access Key ID: Your R2 Access Key ID from the API token
- Secret Access Key: Your R2 Secret Access Key (password)
- Account ID: Your Cloudflare Account ID, used to generate the R2 endpoint
- Bucket Name: Your Cloudflare Bucket Name
Step 3: Advanced Options (Optional)
Additional settings available:
- Server-side Encryption: Choose AES256 or KMS encryption for data at rest
- Storage Class: Select the storage tier for your objects
- Chunk Size: Adjust the chunk size for multipart uploads (default: 5 MiB)
- Upload Cutoff: Set the threshold for switching to chunked uploads (default: 200 MiB)
- Disable Checksum: Skip MD5 checksum storage for faster uploads
Step 4: Complete the Storage Setup
- Click the Add Storage button which automatically verifies credentials and adds the storage.
- Your Cloudflare R2 storage is now ready for backup plans
Common Issues
Invalid Account ID: Ensure you're using the Cloudflare Account ID (found on the R2 overview page), not your email or Zone ID.
Access Denied: Verify your API token has Object Read & Write permissions and is not restricted to a different bucket.
Token Shown Only Once: If you lost your Secret Access Key, delete the token and create a new one from the R2 API Tokens page.
Best Practices
- Use dedicated API tokens with minimum required permissions for Pluton
- R2 offers free egress — a cost-effective choice for backups that need frequent restores
- Enable bucket lifecycle rules to automatically clean up old data
- Consider using separate buckets for different backup plans for easier management