Connecting Seafile
This guide walks you through connecting a Seafile storage destination to Pluton.
Prerequisites
Before connecting Seafile, you need:
- A Seafile server (self-hosted or cloud) — Learn more
- Your Seafile server URL, username (email), and password
- Seafile versions 6.x through 9.x are supported
About Seafile
Seafile is an open-source cloud storage solution that allows self-hosting. It organizes files into libraries, which act as top-level containers. Seafile supports encrypted libraries for additional security and two-factor authentication for account protection.
Getting Your Credentials
Step 1: Note Your Server URL
- Identify your Seafile server URL (e.g.,
https://cloud.seafile.com/for cloud, or your self-hosted domain) - The URL should include the protocol (
https://) and trailing slash
Step 2: Get Your Account Credentials
- Log into your Seafile web interface
- Your username is typically your email address
- If 2FA is enabled, have your authenticator app ready
Step 3: Identify Your Library (Optional)
If you want to target a specific library:
- In the Seafile web interface, go to My Libraries
- Note the exact name of the library you want to use
- For encrypted libraries, you will also need the library password
Connecting to Pluton
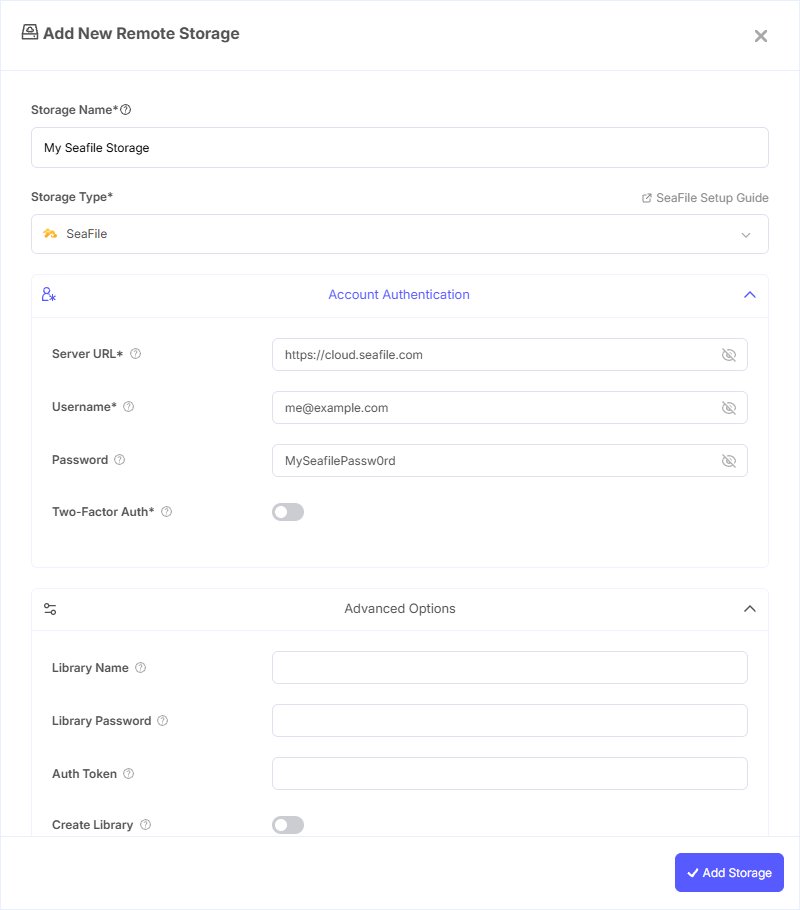
Step 1: Add Storage
- In Pluton, navigate to Storages
- Click Add Storage button
- Select Seafile from the provider list
Step 2: Configure Connection
Fill in the required fields:
- Storage Name: A friendly name (e.g., "Seafile Backups")
- Server URL: The URL of your Seafile host (e.g.,
https://cloud.seafile.com/) - Username: Your Seafile username (usually your email address)
- Password: Your Seafile account password
- Two-Factor Auth: Set to true if your account has 2FA enabled
Step 3: Advanced Options (Optional)
Additional settings available:
- Library Name: Name of a specific library to use. Leave blank to access all non-encrypted libraries
- Library Password: Password for encrypted libraries only
- Auth Token: An existing authentication token (usually auto-generated — leave blank)
- Create Library: Automatically create a library if it doesn't exist
Step 4: Complete the Storage Setup
- Click the Add Storage button which automatically verifies credentials and adds the storage.
- Your Seafile storage is now ready for backup plans
Common Issues
Connection Refused: Verify the server URL is correct and includes the protocol (https://). Ensure your Seafile server is running and accessible from the Pluton server.
Authentication Failure: Double-check your email/username and password. If 2FA is enabled, make sure the Two-Factor Auth option is set to true.
Library Not Found: Ensure the library name matches exactly (case-sensitive). The library must already exist unless Create Library is enabled.
Encrypted Library Access: For encrypted libraries, you must specify both the Library Name and the Library Password. Accessing encrypted libraries in root mode (without specifying a library) is not supported.
Best Practices
- Use library mode (specifying a library name) for best performance, especially with encrypted libraries
- Create a dedicated library for Pluton backups to keep data organized
- Enable 2FA on your Seafile account for additional security
- For self-hosted Seafile, ensure your server uses HTTPS for secure data transfer
- Regularly check your Seafile storage quota and server disk space