Connecting Ceph
This guide walks you through connecting a Ceph object storage destination to Pluton.
Prerequisites
Before connecting Ceph, you need:
- A running Ceph cluster with the RADOS Gateway (RGW) S3-compatible API enabled
- An Access Key ID and Secret Access Key with permissions to read/write objects
- The S3 endpoint URL of your Ceph RADOS Gateway
Getting Your Credentials
Step 1: Create an S3 User
If you have admin access to your Ceph cluster, create an S3 user via the radosgw-admin command:
radosgw-admin user create --uid="pluton-backup" --display-name="Pluton Backup User"
This outputs a JSON response containing your access_key and secret_key. Copy both values.
If you are using a managed Ceph service or dashboard (e.g., Ceph Dashboard, Proxmox), create the user through the web interface and retrieve the S3 credentials from the user details page.
Step 2: Identify Your Endpoint
Your Ceph S3 endpoint is the URL of the RADOS Gateway. Common examples:
https://ceph.example.com(if behind a reverse proxy)http://ceph-node:7480(default RGW port)
Confirm the endpoint with your Ceph administrator if unsure.
Step 3: Create a Bucket (Optional)
You can create a bucket in advance using the s3cmd tool, the Ceph Dashboard, or let Pluton create one when setting up a backup plan:
s3cmd --host=ceph.example.com --host-bucket="" mb s3://pluton-backups
Connecting to Pluton
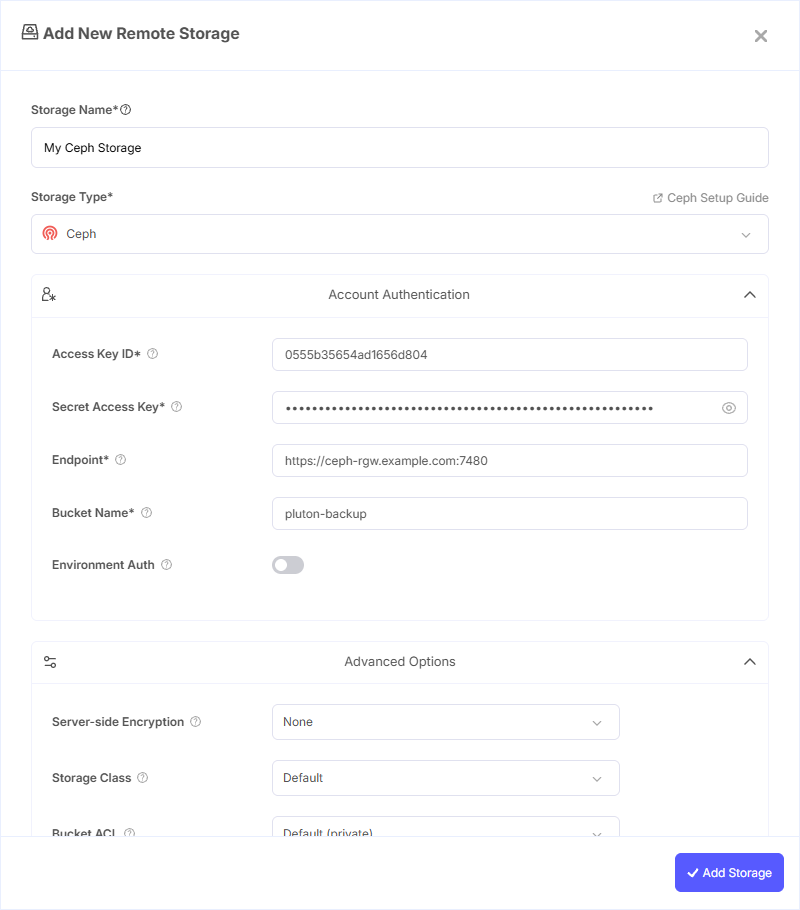
Step 1: Add Storage
- In Pluton, navigate to Storages
- Click Add Storage button
- Select Ceph from the provider list
Step 2: Configure Connection
Fill in the required fields:
- Storage Name: A friendly name (e.g., "Ceph Production Backups")
- Access Key ID: Your Ceph Access Key ID
- Secret Access Key: Your Ceph Secret Access Key (password)
- Endpoint: API endpoint to connect to (e.g.,
https://ceph.endpoint.example.com) - Bucket Name: Your Ceph Bucket Name
Step 3: Advanced Options (Optional)
Additional settings available:
- Server-side Encryption: Choose AES256 or KMS encryption for data at rest
- Storage Class: Select the storage class for new objects (Standard, Reduced Redundancy, etc.)
- Bucket ACL: Set access control for bucket creation (private, public-read, etc.)
- Upload Cutoff: Threshold for switching to chunked uploads (default: 200 MiB)
- Chunk Size: Size of chunks for multipart uploads (default: 5 MiB)
- Force Path Style: Enabled by default; use path-style access for S3 requests (recommended for Ceph)
- Disable Checksum: Skip MD5 checksum storage for faster uploads
Step 4: Complete the Storage Setup
- Click the Add Storage button which automatically verifies credentials and adds the storage.
- Your Ceph storage is now ready for backup plans
Common Issues
Connection Refused: Verify the endpoint URL is correct and that the RADOS Gateway service is running and accessible from the Pluton server.
Access Denied: Ensure the S3 user has sufficient permissions (read/write) on the target bucket. Check that the Access Key ID and Secret Access Key are entered correctly.
SSL Certificate Errors: If using HTTPS with a self-signed certificate, ensure the certificate is trusted on the Pluton server or use HTTP for internal networks.
Bucket Not Found: Confirm the bucket exists and that the S3 user has access. Some Ceph deployments require explicit bucket policies.
Best Practices
- Create a dedicated S3 user for Pluton with minimum required permissions
- Use HTTPS endpoints for production environments to encrypt data in transit
- Enable Force Path Style (enabled by default) — Ceph RGW typically requires path-style access
- Place the Pluton server in the same network as the Ceph cluster for optimal transfer speeds
- Monitor Ceph cluster health and storage capacity to ensure reliable backups