Connecting MinIO
This guide walks you through connecting a MinIO storage destination to Pluton.
Prerequisites
Before connecting MinIO, you need:
- A running MinIO instance — Download here or use an existing deployment
- Access credentials (Access Key ID and Secret Access Key)
- The endpoint URL of your MinIO server
Getting Your MinIO Credentials
Step 1: Locate Your MinIO Endpoint
Your MinIO endpoint is the URL where your MinIO server is accessible. Common examples:
- Self-hosted:
https://minio.yourdomain.comorhttp://192.168.1.100:9000 - Docker:
http://localhost:9000
Step 2: Get Access Credentials
- Log into the MinIO Console (the web UI)
- Navigate to Access Keys in the left sidebar
- Click Create Access Key
- Copy the Access Key and Secret Key
- Important: Save these credentials securely — the Secret Key is shown only once
Alternatively, if you set up MinIO yourself, the root credentials are the MINIO_ROOT_USER and MINIO_ROOT_PASSWORD you configured during installation.
Step 3: Create a Bucket
- In the MinIO Console, go to Buckets
- Click Create Bucket
- Enter a bucket name (e.g., "pluton-backups")
- Configure versioning and settings as needed
Connecting to Pluton
Step 1: Add Storage
- In Pluton, navigate to Storages
- Click Add Storage button
- Select MinIO from the provider list
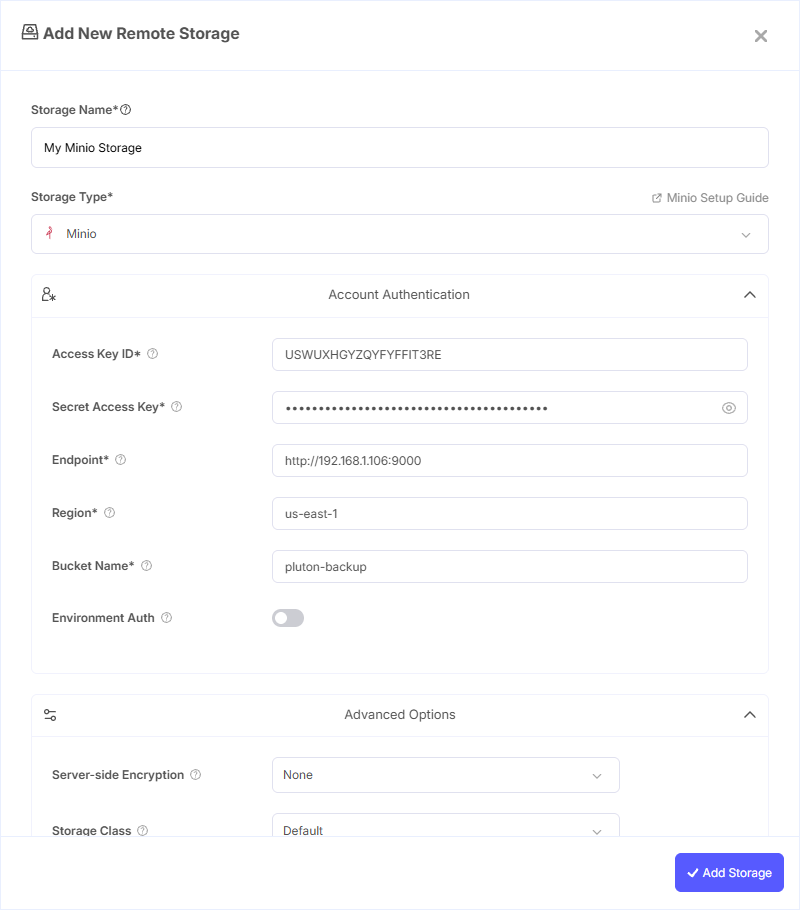
Step 2: Configure Connection
Fill in the required fields:
- Storage Name: A friendly name (e.g., "MinIO Local Backups")
- Access Key ID: Your MinIO Access Key
- Secret Access Key: Your MinIO Secret Key (password)
- Endpoint: Your MinIO server URL (e.g.,
https://minio.yourdomain.comorhttp://192.168.1.100:9000) - Region: Your MinIO region (e.g.,
us-east-1— MinIO defaults tous-east-1if not configured) - Bucket Name: Your Minio Bucket Name
Step 3: Advanced Options (Optional)
Additional settings available:
- Server-side Encryption: Choose AES256 or KMS encryption for data at rest
- Storage Class: Select the storage tier if your MinIO deployment supports multiple tiers
- Chunk Size: Adjust the chunk size for multipart uploads (default: 5 MiB)
- Upload Cutoff: Set the threshold for switching to chunked uploads (default: 200 MiB)
- Force Path Style: Enabled by default for MinIO — required for most self-hosted deployments
Step 4: Complete the Storage Setup
- Click the Add Storage button which automatically verifies credentials and adds the storage.
- Your MinIO storage is now ready for backup plans
Common Issues
Connection Refused: Verify that your MinIO server is running and the endpoint URL is reachable from the Pluton server. Check firewalls and port access.
SSL Certificate Errors: If using HTTPS with a self-signed certificate, ensure your Pluton server trusts the certificate or use HTTP for local/internal deployments.
Access Denied: Verify your access keys have the correct IAM policies attached. Root credentials have full access, but service accounts may have restricted permissions.
Best Practices
- Use dedicated service accounts instead of root credentials for Pluton access
- Enable TLS/HTTPS on your MinIO deployment for encrypted data transfer
- Configure MinIO erasure coding for data durability in production environments
- Set up MinIO bucket notifications to monitor backup activity